Introduction to Origami Diagrams
In the many years that Origami diagrams have been in existance, some standards on how to draw them have been developed. The Yoshizawa-Randlett system, which is accepted as an international standard, was first created by Akira Yoshizawa and then refined by Samuel Randlett and Robert Harbin.
Even though these standards exist there are still many variations in each individual diagramming style. I will try to present the most common symbols and variations here. This should help you to find your way through most Origami diagrams you come across.
You will find most of the symbols shown here again in the section Basic Folds, where they will probably make more sense in context.
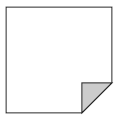 |
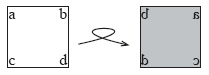
Often (but unfortunately not always) the "paper" shown in diagrams will have a white side and a coloured side, like standard Origami paper (Kami). If this is the case you sometimes find a symbol which shows whether you should start with the
coloured side up |
 or the white side up
  like in the picture on the left.
|
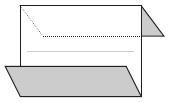
There are different kinds of lines which you will encounter in diagrams.
|
 |


 |
Additionally there are lines that show you where and in which direction to fold the paper.
|


Arrows in diagrams usually tell you in which direction to fold the paper.
 |
Fold the paper where shown. This usually is a valley fold but can be used for other folds as well. |
 |
Fold behind, i.e. make a mountain fold. |
 |
Fold and unfold, creating a crease line. |
 |
Fold behind (mountain fold) and unfold, creating a mountain crease line. |
Fold and unfold arrows also come in the following variants.
 |
Unfold a part of the model in the shown direction. |
 |
Fold and unfold, i.e. first fold in the direction of the normal arrow, and then fold back in the direction of the hollow arrow. |
Apart from these arrows you will regularly encounter the following symbols.
 |
Open the model where shown. |
 |
Push the paper in where shown. This usually is displayed for sink folds. For details what this arrow means in the specific step you will have to refer to the written instruction of the step. |
 |
Patterns like this are usually displayed together with crimp and pleat folds to show how the final layer distribution should be. Check the relevant section in Basic Folds for various examples of this symbol. |
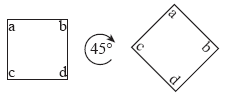
Another set of symbols deals with the way the model is displayed.
 |
Rotate the whole model by the specified amount in the given direction, |
 | |
 |
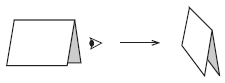
Turn the whole model over in the shown direction. |
 | |
 |
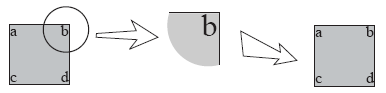
The model will be displayed enlarged from now on. It is also possible that only part of the model will be displayed enlarged for the next steps. |
 |
The model will be displayed smaller from now on. If only part of the model was displayed until now, it will be displayed fully again. |
 | |
 |
The eyes shows a change of viewpoint. In the next step(s) the model will be displayed from a different direction. This often involves a 3D view of the model. |
 | |
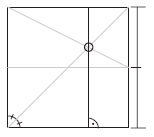
An important group of symbols deals with the problem of reference points, i.e. they show the exact start, end and orientation of folds.
 |
The circle marks an intersection of creases where the fold is supposed to start or pass through. |
 |
Two lines are perpendicular to each other. |
 |
An angle is separated into two (or more) equal parts. |
 |
A line is separated into two (or more), in this example four equal parts. |
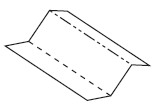
The following diagram shows all of those symbols in use. As a side note, this diagram shows a way to divide a square into thirds. The thick vertical line passing through the circle is at exactly one third of the square.
The last kind of symbol I want to show you is the repeat arrow which comes in many variations.
 |
Repeat the current step on another flap/side of the model. |
 |
Repeat the current step on two other flaps/sides of the model. |
 |
Repeat the current step on three other flaps/sides of the model. |
| etc. | |
 |
Repeat the noted steps on another flap/side of the model. |
 |
Repeat the noted steps on two other flaps/sides of the model. |
| etc. |
When repeating steps you have to keep in mind that sometimes you will have to perform the steps in mirror image.
You should now know all the symbols which are necessary to understand Origami diagrams.
A general hint which is very useful when folding Origami models with diagrams is to always look ahead to the next step to see how the result of the step is supposed to look like. With this you should be able to complete
most steps without having to read the written instructions (although it‘s never a bad idea to read them anyway...).
Next we will learn about the different basic folding manoeuvres which you will need in one form or another for completing Origami models. You will see many of the presented symbols again in usage.