


(back to My Own Designs)
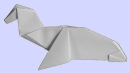
Seal (Version 2)
|
My wife said the first seal looked more like a dog than a seal. So I modified the model to close the back and make it look more like a seal. |
Start with a Fishbase.
 |
Valley Fold

The valley fold is formed by folding the paper toward oneself. An arrow shows where to fold the piece of paper to.
Symbol: dashed line
 |
Valley Fold
The valley fold is formed by folding the paper toward oneself. An arrow shows where to fold the piece of paper to.
Symbol: dashed line
 |
Mountain Fold
The mountain fold is formed by folding the paper away from oneself.
Symbol: alternating dashed and dotted line
 |
Valley Fold
The valley fold is formed by folding the paper toward oneself. An arrow shows where to fold the piece of paper to.
Symbol: dashed line
 |
(Inside) Reverse Fold
Prefold both sheets of paper in both directions (mountain and valley). Then open the model a little bit and bring the top point down so that the mountain fold edge becomes a valley fold edge.
 |
(Inside) Reverse Fold
Prefold both sheets of paper in both directions (mountain and valley). Then open the model a little bit and bring the top point down so that the mountain fold edge becomes a valley fold edge.
 |
(Inside) Reverse Fold
Prefold both sheets of paper in both directions (mountain and valley). Then open the model a little bit and bring the top point down so that the mountain fold edge becomes a valley fold edge.
Valley Fold
The valley fold is formed by folding the paper toward oneself. An arrow shows where to fold the piece of paper to.
Symbol: dashed line
 |
Sink Fold
The sink fold is a method of blunting a point that has no open edges. The fold should first be precreased. Then carefully open the model and tuck the point inside. Flatten the model afterwards along existing creases.
(Inside) Reverse Fold
Prefold both sheets of paper in both directions (mountain and valley). Then open the model a little bit and bring the top point down so that the mountain fold edge becomes a valley fold edge.
(Fold only the front flaps for both folds!)
 |
Valley Fold
The valley fold is formed by folding the paper toward oneself. An arrow shows where to fold the piece of paper to.
Symbol: dashed line
 |
10. The finished seal.